Friday 30 December 2011

Taking a break from Christmas festivities ...


Phew, I’ve taken a break from Christmas festivities and over eating to get back on to the crafty band wagon for the avo.  Following on from making my cushion cover and hoping to come across a piece of Cabbages and Roses fabric to sew on to the front, I’ve relented and accepted the sad fact that I will never come across what I want being sold for a pittance so …. Improvise!  I have created a patchwork square and stitched that to the front, not quite what I envisaged but lovely all the same :)
Remember me?
Patch working.
All made :)
Dib's testing it for comfort !

Saturday 24 December 2011

'Twas the night before Christmas ...

'Twas the night before Christmas, when all through the house
Not a creature was stirring, not even a mouse;
The stockings were hung by the chimney with care,
In hopes that St. Nicholas soon would be there.


Merry Christmas one and all ♥

My lil lads Christmas lantern
(jam jar, tin foil, ribbon and the all important candle,
bish, bash, bosh)

X X X X


Friday 16 December 2011

‘Attempts’ at candle making …

After wanting to try candle making for way too long I finally got the chance and a friend and I were like a couple of kids come candle making day. 
 Sadly our attempt's were unsuccessful - disappointed :(
I thought I would blog about 'failure' so here goes …

I think this is where the blame lies for the failure, we used candle gel.  The reason for using this and not wax is because we were told that perfume and colour could be added to gel where as this couldn't be done with wax? Only trouble is gel is said to be very difficult to work with.


Boiling the gel in a 'double boiler' effect pan and glass bowl - phew, it takes an age to get to the 200o required.


Our vessel and zinc wick ready and waiting ...


Naively, these were the other vessels we had waiting to fill :/


And finally ... our candles.  To the gel we added red food colouring and essential oils.


Only problem, the wick went out as soon as it reached the candle and then would not re-light. 
Our candles are for admiring and looking at but not touching - boo hoo.

Tuesday 13 December 2011

Hopefully cheep but chic cards ...

When ever I go out I seam to always be saying “I’ve just got to pop and buy a boy’s birthday card”, £2.00 later tot’s up to a significant amount by the end of the month.  I've decided to improvise in an attempt to give quirky cards that don't cost a fortune.


I have taken a photo of my son’s Lego characters, printed them, mounted on contrasting paper, glued on to card, and
 Vouloir

I've also ventured on to create other cards using photos ...


Hopefully cheep but chic :)

Monday 12 December 2011

Christmas Crafty presents...

I’ve been racking my brains for a unique and different Christmas present to give that doesn’t cost a fortune.

On my travels I’ve been looking out for things to use to create a Christmas gift that is unique, pretty, and practical but that won't break the bank.  Saturday provided just this opportunity as I was lucky enough to spend the day at an auction with friends.  This was my very first experience of an auction and I’m now totally hooked, it’s like being transfixed in front of a really good live show whilst shopping all at the same time – OMG - perfect, Saturdays just couldn’t get any better!  My one and only purchase (very restrained as I was a tad scared) was a box full of assorted glass which contained two beautiful decanters – the perfect object for a present. I’ve filled them with Orange and Cinnamon luxury bubble bath (the luxury part is because it’s from Waitrose!), added ribbon and finished with a broach.
 I'm so pleased with how they look I'm very tempted to keep them all to myself  ;)

 Linked with bystephanielynn and featuring on her sunday showcase party


Sunday 11 December 2011

Decoupage - A new lease of life to tired, old baubles.

So … after being struck down with a debilitating virus I am now slowing on the road to recovery – yippee.  Spending quality time with the sofa is beginning to get very boring so to break up the monotony I have tried my hand at decoupage. 

For this I used what ever was close to hand, being:

Old Baubles
Scraps of fabric.  Some of the pieces are my daughters old clothes which will bring back memories every year from now on.
PVA glue


I cut the fabric into small pieces using pinking shears to prevent the edges from fraying.  Coated the bauble in glue, attached the fabric then covered the whole bauble in glue.

The end result being …


A new lease of life has been given to a set of tired, old baubles.


Sunday 4 December 2011

Black & white ...

Below is an old photo of my little lad and our beloved Poppy dog.  I was really pleased that I’d managed to capture a ‘moment’ between them but when the photo was developed, due to it being taken in front of the patio door too much light had been behind turning the pic a shade of yellow spoiling it ... or so I thought.  I didn’t want to write it off as a bad job so thought how I could make it work, then eureka!  I turned it into black and white which created a silhouette effect making the affection between then really stand out.  Moral of the story … some photos can really benefit from being changed to black and white and it's definitely worth giving it a try.


Friday 2 December 2011

Scruffy lads on the woodwork ...

Problem ...


Long haired, scruffy lad's on the woodwork.


The solution ...


One frame, cork floor files and a sample pot of metallic paint.


... scruffy lad's are now off the woodwork and looking much more respectable ;)


Thursday 1 December 2011

Bauble tastic ...

A very quick and easy Christmas decoration ……

Whats required: 
Baubles
Chain from any DIY store.  Mine was from B&Q and cost £1.47 a meter (I have two meters).
Crafting wire (or similar)
And something good to watch on the TV at the time of making ;)
Measure the length of the wire (mine was 200cm) then divide by the number of baubles (I had 16), the total is the distance each bauble should be spaced (mine was 12.5cm).


Then, ta, da ...


Cheep and very cheerful.

Experimenting ...

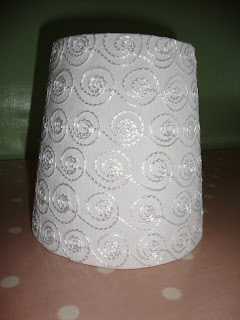
As an experiment I have painted lamp shades in emulsion to see how it looks and if it actually works?  My first attempt was un-successful as it was a plain shade so when the lamp was switched on I realised you could see the brush marks - damn!!  I then tried painting a stitched shade (from IKEA) and this has worked perfectly with no hint that it has been painted at all.  I have had it switched on for hours with no adverse effects – eureka!

I now have lamp shades that perfectly match the colour of our walls, kitchen cupboards, etc (blimey, eeeeek - how OCD am I?) so a worthwhile experiment after all.

Before ...


After ...


Wednesday 30 November 2011

And yet more painting ....

My painting obsession is still going strong and below is a tatty, tired and very black looking bowl that I picked up for the bargain price of 50p


Painting in front of the TV


One re-vamped very festive crimbo bowl showing, once again, a lick of paint works wonders.
(I think that's the reason why I'm hooked).  


Right, I'm off to see what can I paint next!!!


Sunday 27 November 2011

How pretty ...

How pretty is this?  I could never re-create it but would LOVE it hanging on my door this festive Yule.

IMG_2313

♥ Merry, cheesy Chrimbo ♥

As the festive season approaches my thoughts have turned to presents to give that won’t cost an arm and a leg.  On my pressie list is a ‘person’ (who I shall keep nameless) who loves all kinds of different cheeses but has complained they have struggled to find a board long enough on which to display and cut the various cheeses she laden’s her table with.  This gave me an idea ….


An off cut of 8x2 planed timber
(bought from Timm's Builders Merchants, Brize Norton)
A template that I used to draw around to mark where to cut the wood.


After being cut and sanded by my very clever father-in-law (in the absence of a handy family member a timbers merchants or carpenter can help).

I have then treated with several coats of Danish Oil.  Danish Oil is perfect for use on kitchenware, cutting boards, and children's furniture as it is food safe and non-toxic.

It was at this point my husband walked past and said "thats festive, you've designed a Christmas Cracker".  This was un-intentional and all I could see was a cracker before me until my son walked past and said "cool, a sweet"!!!  I'm not sure if this is a happy accident or a design fault?

♥ Merry, cheesy Chrimbo ♥
X X X X

A lick of paint ...

I have been slightly obsessed with treating recent buys to a fresh lick of paint this week.  Below is an example of what has been revitalised with a bit of sanding, undercoating then painting with my fav colour …


Bought for 50p from a car boot sale. 


Ta Da ...
Looking much more loved


A 6x4 photo frame bought for 25p now
suitably matches the lamp base.


I have used a sample pot of paint ...


The painted items can be treated with clear furniture wax to add shine if desired.

Hannant's Wax


It's amazing what a lick of paint can do.


Friday 25 November 2011

Like ‘marmite’ … you either love it or hate it.


Being a very traditional girl I never thought I would have the urge to make a very bright, very sparkly retro picture of my lovely Bertie the Greyhound – but I have! As I really wasn’t sure what the finished article would look like I set about thinking of a way to accomplish it as cheaply as possible. 
The items I gathered are:


An Oak frame bought from a garage sale.


A sample piece of wallpaper
A contrasting piece of wrapping paper
A photo of Bertie taken of him looking to the side
An enlarged photocopy of the photo (which was trial and error to work out the right sized enlargement, as you can see from the three pieces of paper).

I carefully cut of the enlarged photo of Bertie boy ensuring I cut around all off the little tufts and quirks to keep it looking just like him and add personality.

I then drew around the cut out photo on to the back of a sheet of contrasting wrapping paper and, once again, carefully cut out.  (It was at this point I thought I’d made a big mistake choosing a Greyhound as my subject as it looked suspiciously like the Loch Ness Monster).

Then I used the previous picture inside the frame as a template to cover with the sample piece of wallpaper I chose.

I then attempted to glue the silhouette on to the backing wallpaper, this was a mistake as the glue made the paper pucker up and dry with a slight creased look.  I quickly took it away of the backing and let it dry out.  I haven’t attempted to attach both papers together again as the glass keeps the silhouette in place.

The picture was then put into the frame and ...


The photo doesn’t do the ultra sparkly paper justice but I’m sure you get the idea – very bling.

Its like ‘marmite’  … you either love it or hate it.

Wednesday 23 November 2011

Cushion covers ...

Today I attempted to sew an envelope cushion cover using a piece of (much sought after) antique French linen.  Having been told by several friends that this is the easiest way to create a cushion cover I was still un-convinced I could actually pull it off.  I turned to my trusty book ‘Homemade’ (written by Ros Badger & Elspeth Thompson) for no nonsense instructions and after much head scratching and reading the instructions over and over the penny dropped and “yes” it is a very simple way to sew a cushion cover.

The instructions are as follows:

Starting from the finished edge, cut a length of fabric two-and-a-half times longer than the cushion pad, plus 2.5cm (1in) all around to allow for seams.

Fold the fabric, right sides together, as if wrapping around a cushion, so that the edge that you want visible for the outer side of the envelope come two-thirds of the way up the length of the cushion.  Make sure, too, that this edge is inside, facing downwards, with the other flap over the top. (This is the paragraph that foxed me for a while).

Machine or hand stitch securely along the two outside edges of the cover, sewing through two and then three layers of fabric.  Turn the cover inside out, iron if required and insert cushion pad.

Before

                       Ta da .... after

After making the above I got adventurous (cocky) and immediately set to making another one.  This time I did bite off more than I could chew as the fabric I used was patterned.  As you can see from the photo below there is a knack to making sure the fabric is central and I haven’t mastered this yet!! 


To finish my linen cushion off I’m hoping to sew a square of the beautiful Cabbages and Roses fabric on to the front.  My mission now is to try and track down a piece of the below …. Keep your fingers crossed, I think I could be looking for a while!!!

Cabbages and Roses designer Hampshire


Tuesday 22 November 2011

Buttons .....

Something very quick and easy to do in front of the TV during these long, dark winter evenings is to thread buttons on to garden wire, then bend into what ever shape takes your fancy.


Coloured or shiny buttons look bright and cheery if you wanted something to stand out and be seen.